Nowadays, there are so many products of permanent makeup pictures before and after in the market and you are wondering to choose a best one.You have searched for permanent makeup pictures before and after in many merchants, compared about products prices & reviews before deciding to buy them.
You are in RIGHT PLACE.
Here are some of best sellings permanent makeup pictures before and after which we would like to recommend with high customer review ratings to guide you on quality & popularity of each items.
675 reviews analysed
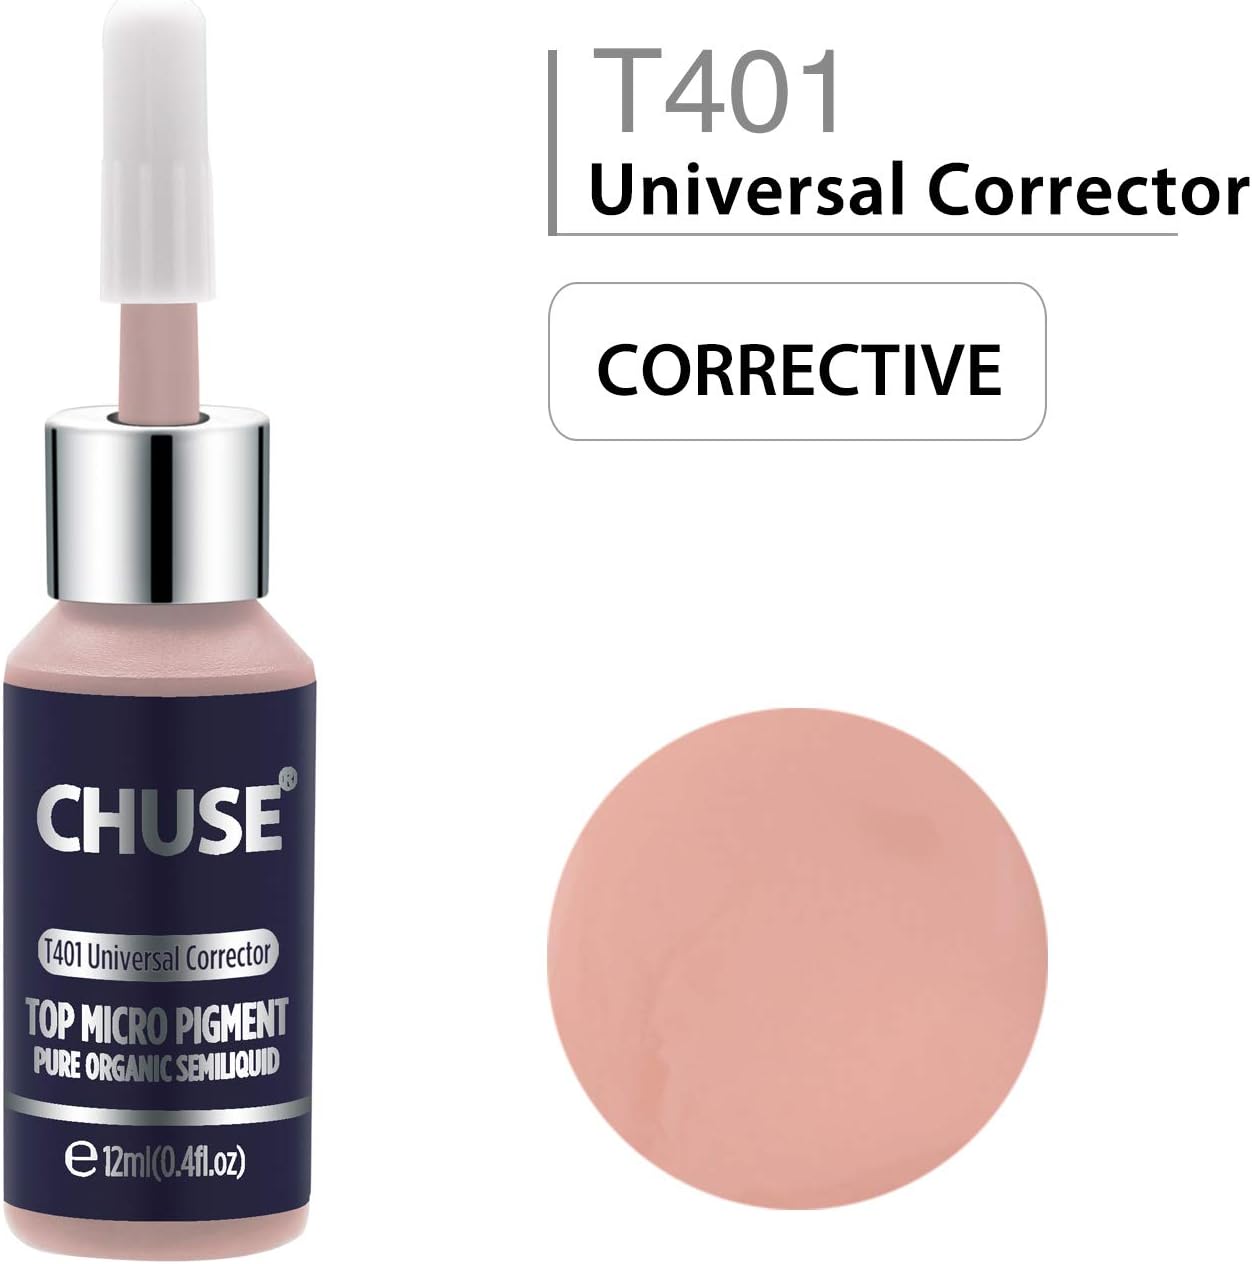


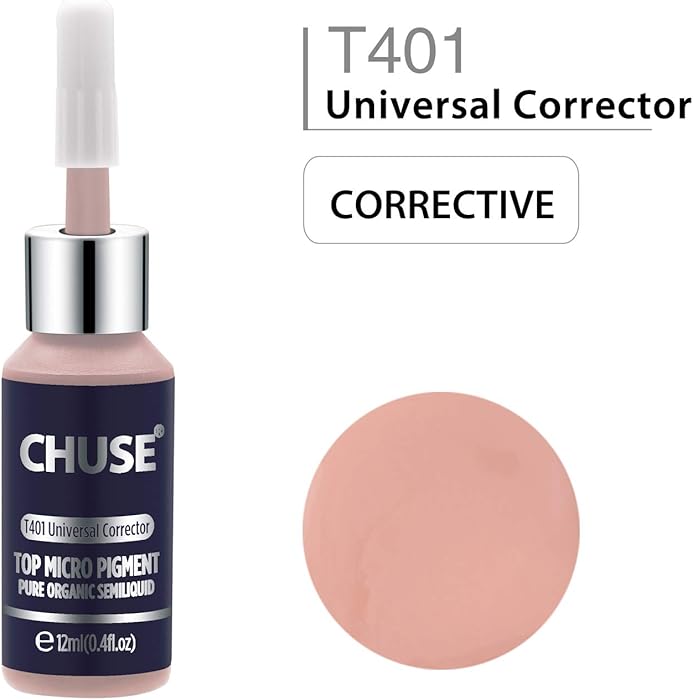
CHUSE T401, 12ml, Universal Corrector, Passed SGS,DermaTest Top Micro Pigment Cosmetic Color Permanent Makeup Tattoo Ink
- Top Permanent Makeup Micro Pigment Cosmetic Color,Certified by SGS,DermaTest
- Adopted organic biological pigments, Natural-looking and rich colors, Excellent for multiple procedures and skin tones.
- Powder has been successfully prepared by new grinding technology, faster coloring effect, Using aseptic packaging environment,more safety and health.
- EXP: 3 Years, Store In A Cool, Dry Area. Keep From Freezing, Shake well and patch test before using.
- This Product Is Non-toxic, Few Individuals May Have Allergic Reactions From This Product, Please Patch Test Required Before Using, We Disclaim Any Responsibilities For Allergic Reactions Of Individuals To Whom This Product Is Applied.
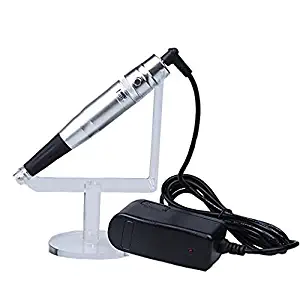
Pinkiou Permanent Makeup Machine Kit Professional Eyebrow Tattoo with Power Supply Eyebrow Makeup (without box)
- Medical grade and healthy, the needle and needle cap is disposable
- Suitable for eyebrows, eyelids and lips,also for small tattoo design
- Speed adjustment,needle length can control
- rotational stability. Small Noises
- 1 pc eyebrow tattoo machine + 1 pc power code + 2pcs 1RL needle + 2pcs 3RL Needle + 2pcs 5RL Needle
FEATURES:
1)Sterile and healthy
2)easy to control
3)Speed adjustment,needle length can control
4) Immediate charge, immediately available.
5)use for small pattern tattoo,eyebrow and lip
ATTENTION:
1, Idling for about 10 seconds to make sure electric conduction is good before use.
2, Please screw the holding tip and you’ll see the needle tube.
3, Please make the needles bent a little before inserting the needle.
4, To avoid the pen being overheated, please stop using for about 10 minutes after a complete tattoo eyebrow.
SPECIFICATIONS:
1. rotational stability.
2. excellent electrical quality.
3. excellent design and work.
4. rocess of forming a power supply,the power supply achieved the EU standard,internationally(100v- 240v)
5. repaired rate is about 1%.
6. the speed can be adjusted on the pen, you can do it with your habit.
7. small noise, the noise has been dealed with less than 15 db
8. suitable for eyebrows, eyelids and lips,also for small tattoo design.
9. all parts of the machine achieved the world health standard.
Beetles Gel No Wipe Matte Top Coat – Soak Off Nail Lamp Gel Nail Polish Matte Finish and Long Lasting for Christmas Gift Set Gel Nail Kit
- Beetles Matte Top Coat Gel No Wipe: Long lasting for 21+ days. Requires drying under UV or LED Lamp. Cure times vary per lighting system. If you experience any problems using this product, please contact us directly. We guarantee a fast replacement or refund service!
- Healthy Nail Lamp Gel Top Coat: 9 Toxin Free Ingredient makes it healthy with low odor! No harsh ingredients or adhesives that lead to damaged nails. Flexible top coat avoids nicks, dims, chips and smudges. Perfect Matte finish.
- Compatible with ALL BRANDS Soak-off Gel Nail Polish Matte. Suitable for natural nails, Nail Lamp gel nails, artificial nails, acrylic nails, nail tips, etc. Beetles Gel Matte Top Coat provides durability and ensures a long-lasting manicure that seals in color and provides a gorgerous matte finish.
- NOTE: With gel nail polish, please always apply thin layer each time! Too much coat or gel on the skin might cause burning feeling when cure under Nail lamp. Please clean gel around nails prior curing as well! Try lower wattage lamp if you were sensitive to heat.
- NOTE: May cause ALLERGIC REACTION. Please take SKIN TEST EVERY TIME before doing manicure. Also, please DO NOT over file down the nail plates or scrap off old polish with a sharp tool! The trauma required to remove the gel nail polish is quite significant. Once it occures, infection can set in and cause problems. Please discontinue using immediately once feeling uncomfortable.
Beetles Pastel Gel Nail Polish Set – Spring Summer Gel Polish, Soak Off Gel Polish Set, Nail Lamp required, 7.3ml Each Bottle Nail Art Gifts Box
- Personal Style: 6 different shades of popular and trendy colors suitable for all seasons and daily routine life!
- Healthy: 9 Toxin Free Ingredient makes it safe and has low odor.
- Easy Application and Good Tenacity.With proper application, last at least 3 weeks.
- Reminder: Cure under nail lamp for 90-120 secs. Base and Top coat required.
- What you get: Color Number is: 127-128-129-130-131-132. 6 Gorgeous shades of Gel Polish, hassle-free and friendly customer service.
Features
· 6 Popular & Trendy Color Gel Polish (Requires Top & Base Coat)
· 9 Toxin Free formula, easy and safe to apply.
· Long lasting for 21+ days with perfect shine.
Certification
· Produced by GMP factory (Good Manufacturing Practice).
· Passed SGS test of Heavy metal and Toxicological risk assessment.
· SDS provided.
Application Process:
1. Preparation: Trim, file and buff nails for a clean and dry surface.
* Before opening the bottle, roll the bottle between your hands back and forth to gently mix.
2. Base Coat: Apply thin base coat, cure under Nail Lamp for 60-90 seconds.
3. Gel polish: Apply first thin layer of color gel polish and cure under Nail Lamp for 90-120 seconds. Apply the second or third layer color gel polish.
* When applying color, wipe excess gel with brush before applying strokes.
4. Top Coat: Finish off with a layer of top coat, cure under Nail Lamp for 90-120 seconds.
* Applying every thin coat is the key
* Tips to avoid chipping:
1. Before applying, please ensure your nails are completely dry, clean and oil-free.
2. Don’t apply gel on the skin or cuticle.
3. Apply gel to the edge of each nail to seal the gel with the brush horizontally to avoid chipping.
Removal Process:
1. Lightly buff off the shine from the top of nails using a nail buffer.
2. Soak a cotton ball or pad with nail gel remover and place on top of each nail.
3. Wrap the nail with aluminum foil or any nail wrap to secure and allow the remover to soak.
4. Soak for a minimum of 15 minutes.
5. Remove cotton and foils one at a time and gently push off gel using a removal wand. Gel should come off easily without much effort. If necessary, re-saturate cotton and rewrap finger and soak for 5 more minutes.
6. Lightly buff nails again once all gel is removed.
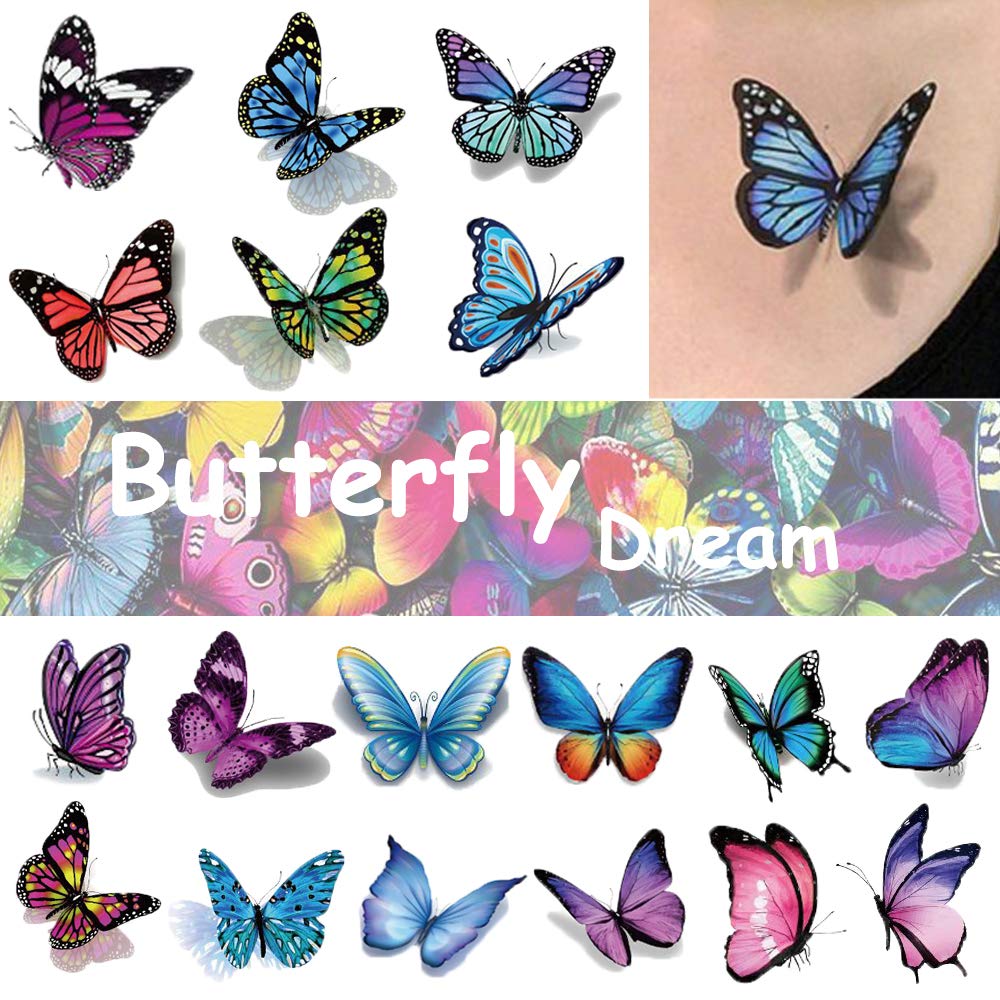
Ooopsi Butterfly Tattoos for Kids Womens – 110 Pcs 3D Tattoos, Colorful Body Art Temporary Tattoos, Butterfly Party Favors
- ❤HIGH QUALITY LONG-LASTING TATTOOS – look spectacular 24/7 for longer as our tattoos will last for several days. Guaranteed to dazzle, our stickers are perfect for women and girls of all ages to get noticed wherever you are.
- ❤12 SHEETS OF BUTTERFIY TATTOOS For THE WHOLE PARTY– 12 premium sheets all in one package, 5.9×3.9″inch. Perfect for Party Accessory
- ❤EASY TO APPLY– There have so many different butterfly and flowers designs, after apply to skin, you can see some 3D effects, like real.Our tattoos for girls and women make showing off your individuality simple and affordable!
- ❤LONG-WEARING AND VIBRANT COLOURS– Safe for kids, Waterproof and sweat-resistant. Easy to apply and remove. Just place face down on skin and dampen with water. Hold it down for about 15 seconds, then remove as you see a fun look!
- ❤Perfect for kids party favors, gift for kids and rewards. Great fun for birthday party,party favors,family gathering, amusement park time, everyday wear and other uses!
Temporary Tattoos offered, also known as fake tattoos, comprise of eco friendly temporary water based tattoos that are easy to apply as well as do not have any harmful effects on the body skin where these are applied, thus making these safe to play with by kids. The superior constitution provided in these temporary tattoos also makes them look like real tattoos and offer safest alternative to permanent tattoos as well as also provide a non-permanent imprint of image of temporary skin tattoos that very much gives the look and feel of a true tattoo. These can be directly applied on body without need of any ink injection in the body, thus also ensuring there is no permanent alteration of the skin due to these temporary skin tattoos.
Whether you’re celebrating a birthday party, baby shower or just for fun – we have the perfect tattoos for the occassion
It’s perfect for:
► Butterfly theme party
► Halloween, Christmas
► Birthday Parties
► Baby Showers
► + Cosplay Parties!
APPLICATION:
1. The skin must be perfectly clean, dry and free of oil or makeup.
2. Cut out the desired tattoo.
3. Gently remove the transparent protective sheet and discard.
4. Place the tattoo, part illustrated sticky on the skin.
5. Wet the back of the tattoo with a damp cloth.
6. Apply steady pressure for 30 seconds.
7. Carefully remove the paper.
LONGEVITY:
These tattoos are temporary. Longevity will depend on various factors such as how often you shower.
if you sweat and the clothes that are worn over the tattoo area.
WARNING:
Do not apply to sensitive skin or near the eyes.
32 Sheets Flower Temporary Tattoos Stickers Lotus Cherry Blossoms Fake Tattoo
- It is perfect for both adults and kids,women,men,girls,boys,teens.
- It will last 2-7 days according to the position you stick it.
- The face tattoos for adults are easy to apply in 10-20 seconds with just water.
- Suitable for different occasion of party, school, holiday, photograph, nightclub, beach, wedding, bridal showers, sleepovers, music festivals, anywhere really.
- Size of semi permanent tattoo: Approx. 19x9cm/ 7.5×3.6 inch(LxW).
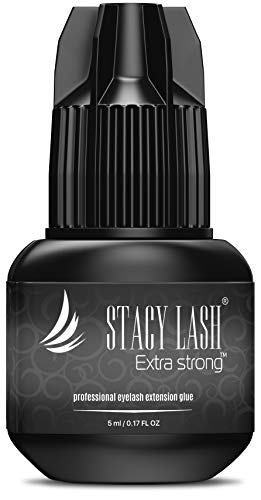
EXTRA STRONG Eyelash Extension Glue – Stacy Lash 5 ml / 1 Sec Drying time/Retention – 7 weeks/Maximum Bonding Power/Professional Use Only Black Adhesive/for Semi-Permanent Extensions Supplies
- ★ EXTRA STRONG – thanks to the new advanced formula this eyelash extension glue has an incredible retention power, with eyelash extensions lasting up to 7 weeks. Strongest bonding and longest retention period on the market. This lash extension glue is the best choice for advanced lash extension stylists.
- ★ FAST DRY TIME – 0.5-1 seconds. This eyelash adhesive has been designed for highly skilled lash artists, with fast dry time adding to speed of eyelash extension procedures. It works just as well in high humidity (RH 50-70%)
- ★ SEALED PACKAGE and GLUE NEEDLE – we take care of our clients, having packed the Stacy Lash Extra Strong eyelash extension glue in a special sealed package with silica gel and red glue needle inside to preserve maximum glue freshness before it is opened and significantly extend the life of adhesive after bottle opening (up to two months)
- ★ QUALITY ASSURANCE – Stacy Lash glue is FORMALDEHYDE-FREE and LATEX-FREE. We protect you and your clients by providing products of only the highest premium quality, which complies with the standards ISO 9001 and ISO 14001
- ★ 100% MONEY-BACK GUARANTEE – if you are not 100% satisfied, just contact us and we will do our best for you. The mission of the Stacy Lash brand is to provide the eyelash extension experts with superior quality and premium grade materials to give ultimate highlight to the beauty of the eyes of your clients.
Lyon Lash Eyelash Extension Supplies 4×100 Packs – 100 Pairs Under Eye Gel Pads | 100 Disposable Mascara Brushes Wands | 100 Micro Applicators Brush | 100 Glue Ring Holder | 2 Medical Tapes
- PACKAGE INCLUDES -100 Pairs Eye Gel Patches & 100 pieces Mascara Wands Applicator /Eye Lash Brushes & 100 pieces Microswabs & 100 pieces Lash Extension Glue Rings Holders & 2 Eyelash Tapes (length is 9m).
- 100 PCS UNDER EYE PADS/ GEL PATCHES WITH ALOE VERA & VITAMIN C – This is perfect type of lint free eyepads for lash artists during the eyelash extension. It is also perfect for facials, eyelash perming, eyelash tinting, microblading to reduce dark circle, eye puffiness, wrinkles.
- 100 PCS MASCARA WANDS APPLICATOR & 100 PCS MICROSWABS – Eyelash brushes are awesome for separating eyelashes and de-clumping mascara before or after eyelash extensions application. Microswabs are perfect tools for removing eyelashes with the use of eyelash cream or gel remover.
- 100 PCS EYELASH EXTENTION RINGS – Incredible tools to hold eyelash extension glue, pigment, ink, remover or lash primer during eyelash extensions and tattoo applications.
- 2 ROLLS OF EYELASH TAPES -The white eyelash tapes are made of non-woven fabrics
- They are lint free and each roll is approx. 354 inch in total length. The width is 0.5 inch.
Lyon Lash Eyelash Extension Supplies 4×100 + 2 Mega Pack is a premium supplies kit for eyelash extension, which includes –
1. 100 Pairs of Lyon Lash Eyelash Extension Eyepads
Lyon Lash under eye hyodrogel pads are of premium quality. The major ingredients are aloe vera and vitamin C. They are used to cover and protect bottom lashes during eyelash extensions. The shapes of the eyepads are curved to fit most eyes so you don’t need to trim the pads. This eye patch gradually releases moisture and essence to your clients’ eye area. As it is lint-free, there are no stray strands of lint or fiber to spoil the look of your eyelash extensions.
2. 100 Pieces of Mascara Wands
Lyon Lash masacra eyelashes brushes are professional makeup tool, which can comb the eyelashes. Work well on eyelash extensions or even fake lashes. Perfect for separating eyelashes during eyelash extensions. These eyelash mascara brushes are suitable for professional beauty salon and personal home use.
3. 100 Pieces of Microswabs
Use Micro Swabs with Gel Adhesive Remover, Lash Primer, Pre-Treatment, Liquid Protein Remover. Great to use when you only need to apply small amount.
4. 100 Pieces of Glue Ring Holders
Lyon Lash makeup rings holders are the best to use for holding glue, pigment, ink, remover or lash primer during application of eyelash extensions and tattoo applications. Just simply put the ring on your less dominant hand & dispense a drop into the well. The finger ring diameter is adjustable, fit for most fingers, convenient to use. They are fit tightly, no need to worry that the glue will spill. They are easy to clean and reuse again and makes the eyelash application much easier.
5. 2 Rolls of Medical Grade Eyelash Tapes (354 inch each)
The Lyon Lash adhesive tapes are made of non-woven lint-free fabrics. Perfect for holding down the lower lashes that you can’t cover with the under gel patches.
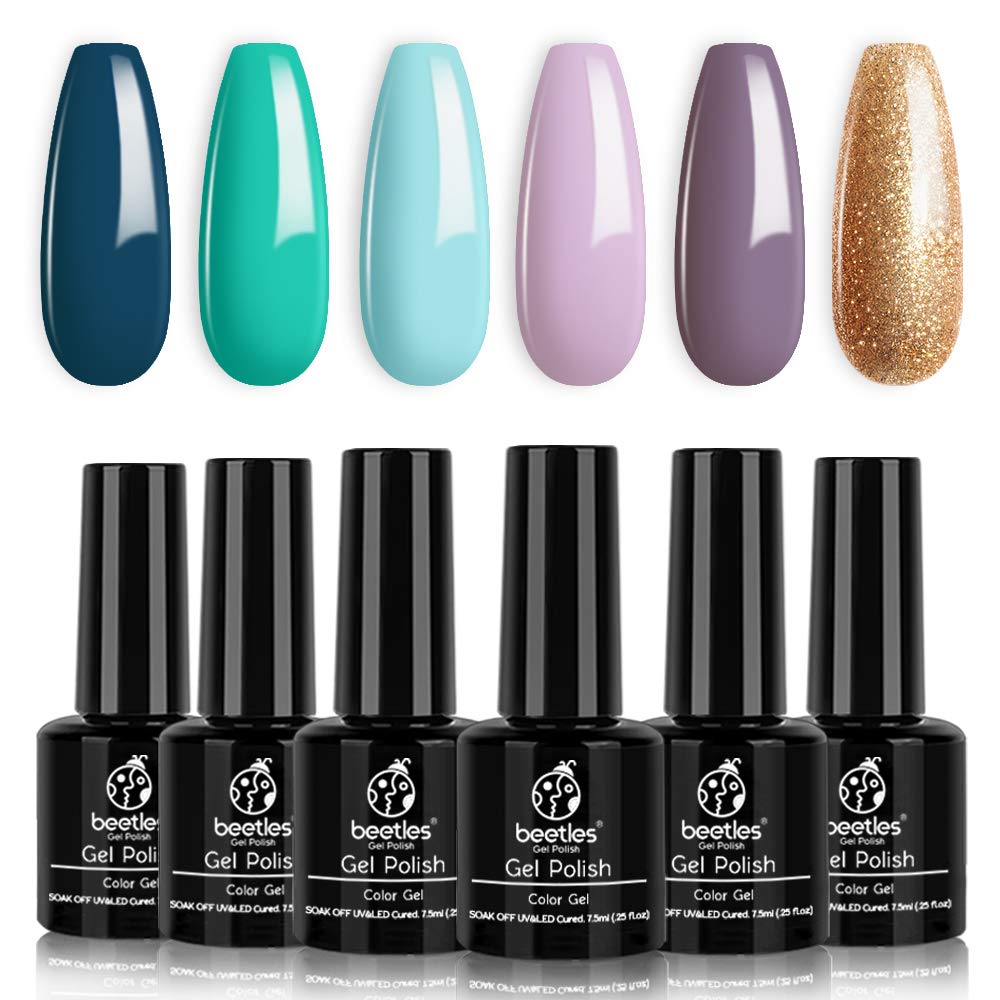
Beetles Gel Nail Polish Set, Treasure Chest Collection Turquoise Lilac Shade Glod Shimmer Soft Blue Nail Gel Polish Nail Art LED Soak Off Gel Color Set, 7.3ml Each Bottle
- Gel Nail Polish Set: Enjoy a Classic Blue long lasting gel nail polish beauty and Turquoise Blue tone turn fantasy into reality. A soft purple shade of discreet beauty. And you can show off your sense of style with lovely lilac.
- Healthy: 9 Toxin Free Ingredient makes it safe and has low odor. Treasure chest Set is inspired from the deep blue sea and its cool shade of blue, purple and turquoise colors! An added gold glitter for the perfect pairing and perfect for Spring and Summer vacations.
- Easy Application and Good Tenacity.With proper application, last at least 3 weeks.
- Reminder: Cure under LED lamp for 90-120 secs. Base and Top coat required.If gel feels thick or tacky, place in hot water for 1-2 minutes, remove from water and shake well.
- What you get: Color Number is: 623-624-625-626-627-628. 6 Gorgeous shades of Gel Polish, hassle-free and friendly customer service.
Features
· 6 Popular & Trendy Color Gel Polish (Requires Top & Base Coat)
· 9 Toxin Free formula, easy and safe to apply.
· Long lasting for 21+ days with perfect shine.
Certification
· Produced by GMP factory (Good Manufacturing Practice).
· Passed SGS test of Heavy metal and Toxicological risk assessment.
· SDS provided.
Application Process:
1. Preparation: Trim, file and buff nails for a clean and dry surface.
* Before opening the bottle, roll the bottle between your hands back and forth to gently mix.
2. Base Coat: Apply thin base coat, cure under LED lamp for 60-90 seconds.
3. Gel polish: Apply first thin layer of color gel polish and cure under nail dryer for 90-120 seconds. Apply the second or third layer color gel polish.
* When applying color, wipe excess gel with brush before applying strokes.
4. Top Coat: Finish off with a layer of top coat, cure under LED lamp for 90-120 seconds.
* Applying every thin coat is the key
* Tips to avoid chipping:
1. Before applying, please ensure your nails are completely dry, clean and oil-free.
2. Don’t apply gel on the skin or cuticle.
3. Apply gel to the edge of each nail to seal the gel with the brush horizontally to avoid chipping.
Removal Process:
1. Lightly buff off the shine from the top of nails using a nail buffer.
2. Soak a cotton ball or pad with nail gel remover and place on top of each nail.
3. Wrap the nail with aluminum foil or any nail wrap to secure and allow the remover to soak.
4. Soak for a minimum of 15 minutes.
5. Remove cotton and foils one at a time and gently push off gel using a removal wand. Gel should come off easily without much effort. If necessary, re-saturate cotton and rewrap finger and soak for 5 more minutes.
6. Lightly buff nails again once all gel is removed.
Beetles Gel Nail Polish Starter Kit with 48W UV/LED Light Nail Lamp Base Top Coat 3 Timer Setting, Soak Off Gel Polish 6 Colors Manicure Tools Essentials Nail Art Designs Holiday Set
- ENJOY DIY :As Gel Nail Polish Kit with uv light, you can enjoy doing your nails at home with this gel nail polish set to complete ALL-IN-ONE Kit! Everything you need to start doing your nails yourself! This lamp has no bottom, making it lighter to carry and use. If you are still accustomed to the bottom of the lamp belt, it is recommended to place a paper towel commonly used at home on the bottom of the lamp for easy cleaning and packing.
- HIGH POWER LAMP: Beetles Gel Nail Polish Starter Kit With UV Nail Lamp – Classic Shape with 48W High Power to cure all kinds of gel nail polish. 30 LEDs cuts curing time in half!
- PERSONAL STYLE: The gel nail polish kit set includes 6 gorgeous colors of 9 Toxin Free Gel Polish with low odor – No harsh ingredients or adhesives that lead to damaged nails.
- HIGH COST-EFFECTIVE: Full size of Gel Polish Nail Kit, Durable UV Lamp, high quality nail kit for a cost-effective price, guaranteed!
- SERVICE: Get beautiful nails with Beetles Gel Polish! As a valued Beetle Beauty customer, we want you to be fully satisfied with your products. Please contact us directly if there are any problems. We guarantee a fast replacement or refund service!
Package Content
1. Gel Nail Polish 7.5ml X6
2. 48W LED UV Nail Lamp X1
3. No Wipe Top Coat Gel Base Coat 7.5ml X3
4. Cuticle Oil X 1
5. Nail File X 1
6. Nail Buffer x 1
7. Nail Brush for Hands X 1
8. Nail Brush for Toes X 1
9. Cuticle Fork X 1
10. Cuticle Pusher X 1
11. Nail Clipper X 1
12. Nail Separator X 2
Application Process:
1. Preparation: Trim, file and buff nails for a clean surface.
✰ Before opening the bottle, roll the bottle between your hands back and forth to gently mix.
2. Base Coat: Apply thin base coat, cure under UV/LED lamp for 60 seconds.
3. Gel polish: Apply first thin layer of color gel polish and cure under UV/LED lamp for 60 seconds. Apply the second or third layer color gel polish.
✰ When applying color, wipe excess gel with brush before applying strokes.
4. Top Coat: Finish off with a layer of top coat, cure under UV/LED lamp for 60 seconds.
✰ Seal the edges of your nails with the brush horizontally to avoid chipping
*Tips to avoid chipping:
1. Before applying, please ensure your nails are completely dry, clean and oil-free.
2. Don’t apply gel on the skin or cuticle.
3. Apply gel to the edge of each nail to seal the gel and avoid chipping.
Removal Process:
1. Lightly buff off the shine from the top of nails using a nail buffer.
2. Soak a cotton ball or pad with nail gel remover and place on top of each nail.
3. Wrap the nail with aluminum foil or any nail wrap to secure and allow the remover to soak.
4. Soak for a minimum of 10 minutes.
5. Remove cotton and foils one at a time and gently push off gel using a removal wand. Gel should come off easily without much effort. If necessary, re-saturate cotton and rewrap finger and soak for 5 more minutes.
6. Lightly buff nails again once all gel is removed.
Conclusion
By our suggestions above, we hope that you can found Permanent Makeup Pictures Before And After for you.Please don’t forget to share your experience by comment in this post. Thank you!
Our Promise to Readers
We keep receiving tons of questions of readers who are going to buy Permanent Makeup Pictures Before And After, eg:
- What are Top 10 Permanent Makeup Pictures Before And After for 2020, for 2019, for 2018 or even 2017 (old models)?
- What is Top 10 Permanent Makeup Pictures Before And After to buy?
- What are Top Rated Permanent Makeup Pictures Before And After to buy on the market?
- or even What is Top 10 affordable (best budget, best cheap or even best expensive!!!) Permanent Makeup Pictures Before And After?…
- All of these above questions make you crazy whenever coming up with them. We know your feelings because we used to be in this weird situation when searching for Permanent Makeup Pictures Before And After.
- Before deciding to buy any Permanent Makeup Pictures Before And After, make sure you research and read carefully the buying guide somewhere else from trusted sources. We will not repeat it here to save your time.
- You will know how you should choose Permanent Makeup Pictures Before And After and What you should consider when buying the Permanent Makeup Pictures Before And After and Where to Buy or Purchase the Permanent Makeup Pictures Before And After. Just consider our rankings above as a suggestion. The final choice is yours.
- That’s why we use Big Data and AI to solve the issue. We use our own invented, special algorithms to generate lists of Top 10 brands and give them our own Scores to rank them from 1st to 10th.
- You could see the top 10 Permanent Makeup Pictures Before And After of 2020 above. The lists of best products are updated regularly, so you can be sure that the information provided is up-to-date.
- You may read more about us to know what we have achieved so far. Don’t hesitate to contact us if something’s wrong or mislead information about Permanent Makeup Pictures Before And After.